The Timeline
The Railcut timeline is the main editing surface. Here’s a map of what’s where and what it all does.
Layout
Section titled “Layout”Toolbar
Section titled “Toolbar”The toolbar is docked on the side of the panel and can be moved to the left or right edge. It includes:
- Tool selector — buttons for all editing tools (Select, Track Select, Ripple, Rolling, Razor, Slip, Slide, Pen, Zoom, Hand, etc.)
- Snap toggle — magnet icon, or press Shift+S
- Add marker — adds a marker to the selected clip, or to the timeline if nothing is selected
- — opens the settings menu, including:
- Settings — preferences, cache controls, and license management
- Keyboard Shortcuts — preset selection, shortcut editing, import/export, and AE shortcut import
- Close Gaps — ripples clips left to remove gaps
- Selection Follows Playhead — clips touching the playhead auto-select
- Sync Selection to AE — mirrors Railcut clip selections to AE layer selections
- Show Video Tracks / Show Audio Tracks — collapse either track section to reclaim vertical space
- Show Thumbnails / Show Waveforms — hide or show generated media previews
- Show Opacity Keyframes / Show Audio Keyframes — hide or show keyframe lines
- About, Submit Feedback, and Help
- Bell icon — opens the What’s New dialog. A badge appears when a new version has shipped. The dialog shows release notes organized by version — click any entry to expand it.
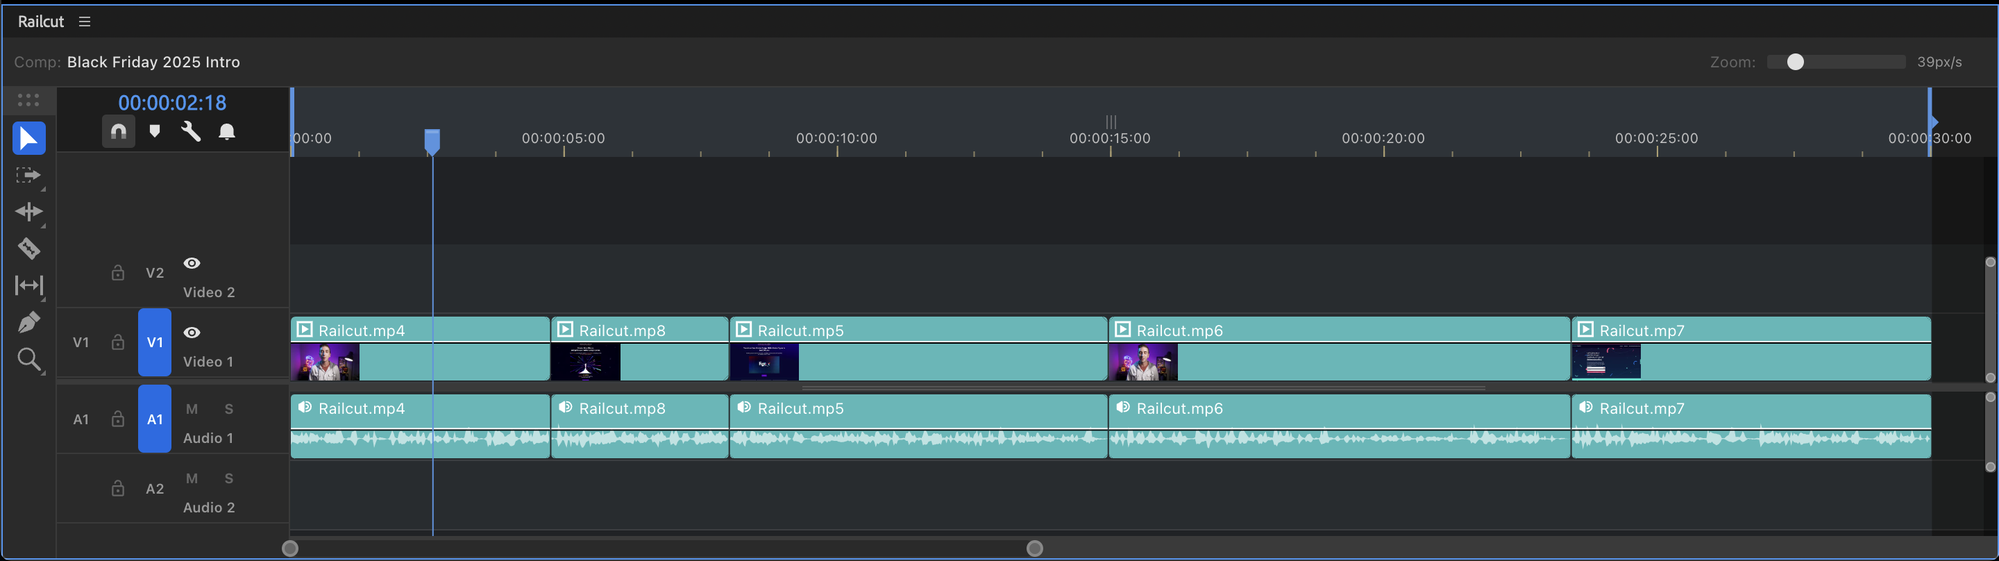
The top bar shows the current timecode and active composition name. Click the timecode and type a value to jump to a specific time, or click and drag it to scrub.
Time ruler
Section titled “Time ruler”The ruler at the top of the track area shows timecode. Click anywhere on the ruler to jump the playhead to that time. Drag the playhead to scrub.
Track area
Section titled “Track area”The main canvas where your clips live. Clips are drawn as colored blocks matching the AE label color of each layer.
Video tracks sit above the center line. Audio tracks sit below. The track area scrolls horizontally and vertically independently.
Track controls
Section titled “Track controls”The column on the left shows one set of controls per track. Each set includes:
- Track name — click to rename
- Visibility toggle (Eye)
- Lock — locks the entire track against editing. Locked tracks are skipped by all edit operations: Add Edit, Delete, Ripple Delete, Extract, Lift, and Razor (split all). Clips on locked tracks can still be selected and viewed, but not modified.
- Mute (M)
- Solo (S)
- Track Patch — determines where clips’ audio/video sources are placed when added to the timeline
- Track Target — influences certain editing actions
Right-click anywhere in the track controls area to add or delete tracks.
Track types
Section titled “Track types”Video tracks
Section titled “Video tracks”Video tracks appear above the center divider, stacked bottom-to-top (V1 at the bottom). Clips on higher-numbered tracks appear visually on top in the AE comp.
Each video clip shows:
- A color bar using the layer’s AE label color
- First-frame thumbnails (when enabled in Settings → Cache)
- The clip name
- Opacity keyframe line (when the track is tall enough to display it)
Audio tracks
Section titled “Audio tracks”Audio tracks appear below the center divider, stacked top-to-bottom (A1 at the top). Each audio clip shows:
- An amplitude waveform (when enabled in Settings → Cache)
- Audio level keyframe line (when the track is tall enough to display it)
Clips with both video and audio sources appear as linked clips on both video and audio tracks. Linked clips select and move together by default, and Railcut shows a sync badge when the video and audio sides are offset from each other.
Clip display
Section titled “Clip display”Thumbnails
Section titled “Thumbnails”When Show Thumbnails is enabled (Settings → Cache), video clips show a first-frame thumbnail extracted from the source file.
Waveforms
Section titled “Waveforms”When Show Waveforms is enabled (Settings → Cache), audio clips display an amplitude waveform. See Audio Waveforms for details.
Label colors
Section titled “Label colors”Clip colors match AE’s label system. Right-click a clip and select a color swatch to change the label. This applies to all selected clips.
Linked clips and groups
Section titled “Linked clips and groups”Linked A/V clips show a small link indicator and normally select, move, and edit together. Hold Alt with most edit tools to work on only the video or audio side.
Clip groups keep multiple selected clips together for selection and movement. Use groups when several separate clips should travel together as one unit.
Track height
Section titled “Track height”Drag the bottom edge of any track header to resize that track’s height. Taller tracks show more clip detail.
When a track is short, the track name and keyframe lines are hidden to keep the display clean. Expand the track height to reveal them.
You can also use Alt+Scroll on the track header sidebar to resize all tracks simultaneously, or use keyboard shortcuts:
- Shift+– — minimize all tracks
- Shift+= — expand all tracks
- Ctrl+= / Ctrl+– — increase or decrease video track height
- Alt+= / Alt+– — increase or decrease audio track height
Keyframe lines and the Pen tool
Section titled “Keyframe lines and the Pen tool”Railcut displays keyframe lines on clips for two properties:
- Opacity — on video clips
- Audio level — on audio clips
Keyframe lines are only visible when the track is tall enough to display them. Toggle their visibility globally with → Show Opacity Keyframes and Show Audio Keyframes.
Editing keyframes
Section titled “Editing keyframes”Press P to activate the Pen tool. With the Pen tool active:
- Click on the keyframe line to add a keyframe at that point
- Click and drag an existing keyframe to move it in time or change its value
- Click and drag on an empty area of the clip to marquee-select multiple keyframes at once
- Right-click a keyframe to delete it
The Selection tool (V) can also manipulate keyframes — click and drag any existing keyframe point to reposition it. Use the Pen tool when you need to add new keyframes.
Keyframe interpolation
Section titled “Keyframe interpolation”Right-click any keyframe to set its interpolation type:
- Linear — constant rate of change between keyframes
- Bezier — smooth ease with manually adjustable handles (in AE’s Graph Editor)
- Auto Bezier — smooth ease with automatically calculated handles
- Continuous Bezier — smooth ease that maintains continuous velocity through the keyframe
- Hold — value snaps to the next keyframe with no interpolation (hold frame)
- Ease In — applies a smooth deceleration into this keyframe
- Ease Out — applies a smooth acceleration out of this keyframe
- Delete — removes the keyframe
These map directly to AE’s temporal interpolation types.
Zoom controls
Section titled “Zoom controls”| Action | How |
|---|---|
| Zoom in | + |
| Zoom out | - |
| Zoom to fit sequence | \ (toggles between fit-all and previous zoom) |
| Zoom toward cursor | Alt+Scroll on the timeline canvas |
| Resize all track heights | Alt+Scroll on the track controls sidebar |
| Increase/decrease video track height | Ctrl+= / Ctrl+– |
| Increase/decrease audio track height | Alt+= / Alt+– |
| Minimize all tracks | Shift+– |
| Expand all tracks | Shift+= |
| Pan timeline | Middle mouse drag, or use the Hand tool (H) |
Scrolling
Section titled “Scrolling”- Horizontal — plain scroll, the scrollbar at the bottom, or middle mouse drag
- Vertical — Ctrl+Scroll, or drag with the Hand tool (H)
- Zoom — Alt+Scroll toward the cursor
The playhead (CTI)
Section titled “The playhead (CTI)”- Click the ruler — jumps the playhead to that position
- Drag the playhead — scrubs through the timeline
- Arrow keys — step one frame at a time
- Shift+Arrow — step 10 frames at a time
- Home / End — jump to the start or end of the comp
- Up/Down arrows — jump to previous/next edit points
- Shift+I/O — jump to in/out points
During playback, the playhead animates in real time showing an estimate of After Effects’ current time.