The Timeline
The Railcut timeline is the main editing surface. Here’s a map of what’s where and what it all does.
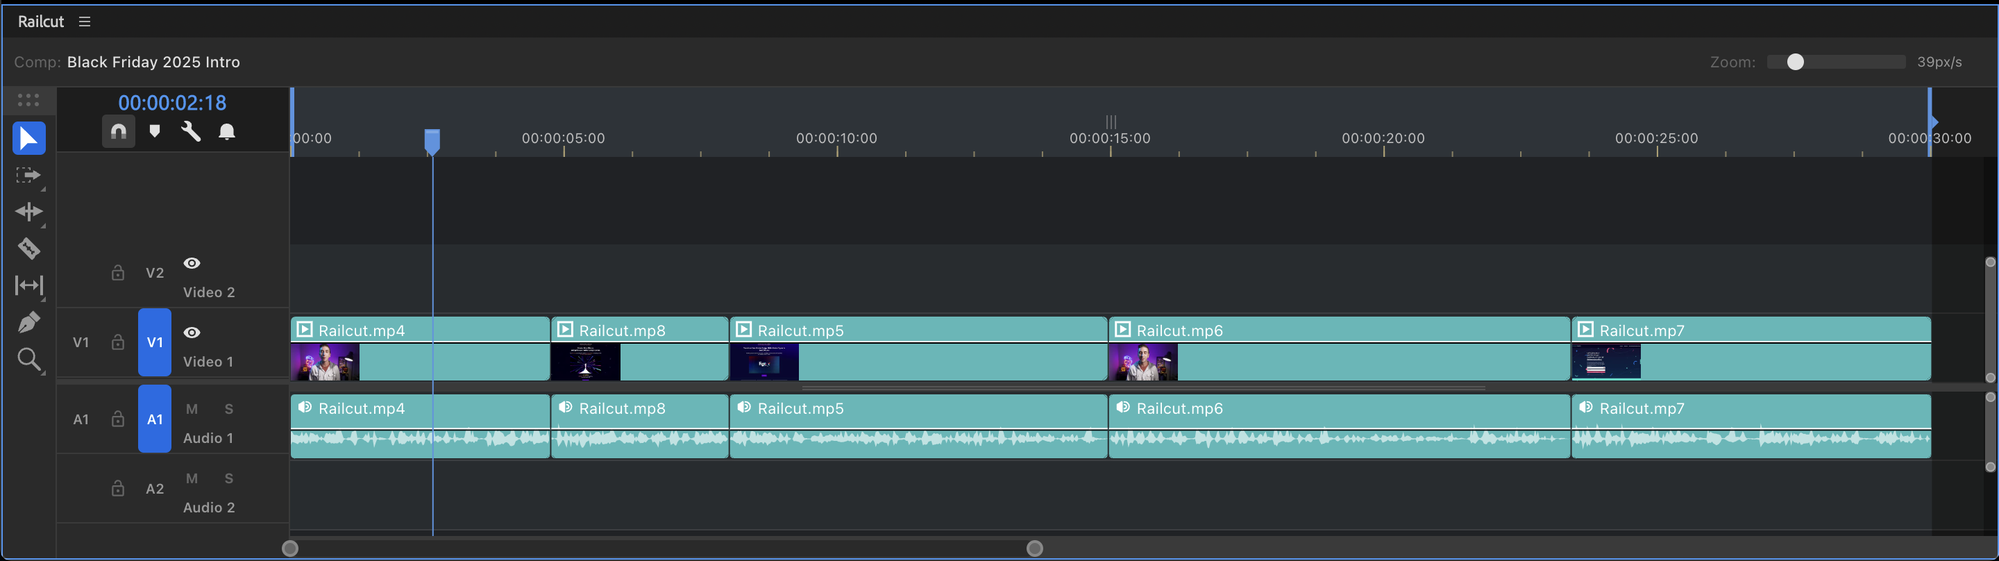
Anatomy of the timeline
Section titled “Anatomy of the timeline”Toolbar
Section titled “Toolbar”The toolbar runs across the top of the panel. Left to right:
- Timecode display — shows the current playhead time in HH:MM:SS:FF format. Click and type to jump to a specific time.
- Comp name — displays the name of the active composition
- Tool selector — icons for all editing tools (Selection, Ripple, Rolling, Blade, etc.)
- Snap toggle — magnet icon, or press Shift+S
- Bell icon — opens the What’s New dialog
- — opens the settings menu, including display toggles:
- Selection Follows Playhead — clips touching the playhead auto-select when playback stops
- Estimate Playhead Position During Playback — smoother CTI movement on slower machines
- Show Opacity and Volume Lines — hide or show the rubber band lines on clips
- Show Video Tracks / Show Audio Tracks — collapse either track section to reclaim vertical space
Time ruler
Section titled “Time ruler”The narrow ruler at the top of the track area shows timecode. Click anywhere on the ruler to jump the playhead to that time. Drag the playhead to scrub.
Track area
Section titled “Track area”The main canvas where your clips live. Clips are drawn as colored blocks matching the AE label color of each layer.
Video tracks sit above the center line. Audio tracks sit below. The track area scrolls horizontally and vertically independently.
Track headers
Section titled “Track headers”The column on the left shows one header per track. Each header includes:
- Track name — click to rename
- Visibility toggle (video tracks) — eye icon
- Mute button (audio tracks, M)
- Solo button (S)
- Lock button — locks the track against editing
Right-click anywhere in the track header area to add or delete tracks.
Track types
Section titled “Track types”Video tracks
Section titled “Video tracks”Video tracks appear above the center divider, stacked bottom-to-top (V1 at the bottom). Clips on higher-numbered tracks appear visually on top in the AE comp.
Each video clip shows:
- A color bar using the layer’s AE label color
- Frame thumbnails (when enabled in Settings → Cache)
- The clip name
- Opacity keyframes as a rubber band graph (when the Pen tool is active)
Audio tracks
Section titled “Audio tracks”Audio tracks appear below the center divider, stacked top-to-bottom (A1 at the top). Each audio clip shows:
- An amplitude waveform (when enabled in Settings → Cache)
- Audio level keyframes as a rubber band graph (when the Pen tool is active)
Audio-only clips appear only on audio tracks. Clips with both video and audio appear on both a video track and a linked audio track.
Clip display
Section titled “Clip display”Thumbnails
Section titled “Thumbnails”When Show Thumbnails is enabled (Settings → Cache), video clips show a series of frame thumbnails extracted from the source file.
Waveforms
Section titled “Waveforms”When Show Waveforms is enabled (Settings → Cache), audio clips display an amplitude waveform. See Audio Waveforms for details.
Label colors
Section titled “Label colors”Clip colors match AE’s label system. Right-click a clip and select a color swatch to change the label. This applies to all selected clips.
Zoom controls
Section titled “Zoom controls”| Action | How |
|---|---|
| Zoom in | = key |
| Zoom out | - key |
| Zoom to fit sequence | \ key (toggles between fit-all and previous zoom) |
| Zoom toward cursor | Alt+Scroll on the timeline canvas |
| Resize track height | Alt+Scroll on the track header sidebar |
| Minimize all tracks | Shift+– |
| Expand all tracks | Shift+= |
Scrolling
Section titled “Scrolling”- Horizontal — scrollbar at the bottom, or horizontal trackpad gesture
- Vertical — vertical trackpad gesture, or drag with the Hand tool (H)
The playhead
Section titled “The playhead”The red vertical line is the Current Time Indicator (CTI). It represents the current time in the composition.
- Click the ruler — jumps the playhead to that position
- Drag the playhead — scrubs through the timeline
- Arrow keys — step one frame at a time
- Shift+Arrow — step 10 frames at a time
- Home / End — jump to the start or end of the comp
During RAM Preview, the playhead animates in real time showing estimated playback position.